
December 11 - I met with the car's owner in Washington, DC to discuss the project. Our plan is do the work in three stages as a rolling restoration. First, we will repair everything necessary to get the car running and stopping, including the ignition and fuel systems, electrical system, clutch and brakes. During the second stage, we will repair the suspension and exhaust systems, and possibly convert the charging system to an alternator. Finally, we will work on the body and interior, repairing rusted panels, prepping the car for paint, replacing the top and restoring the interior as needed.
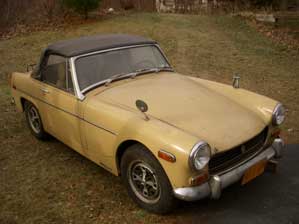
 removed the grill, the bonnet, and the chrome strip on the bottom front
edge of the bonnet, finding extensive rust along the front edge. It had
been poorly repaired previously with Bondo behind the chrome strip. We
will either repair the front edge by welding in new metal or replace the
entire bonnet. Also, installed a battery and turned over the engine
to make sure it wasn't seized. So
far...so good.
removed the grill, the bonnet, and the chrome strip on the bottom front
edge of the bonnet, finding extensive rust along the front edge. It had
been poorly repaired previously with Bondo behind the chrome strip. We
will either repair the front edge by welding in new metal or replace the
entire bonnet. Also, installed a battery and turned over the engine
to make sure it wasn't seized. So
far...so good.

December 13, 2010- The fuel pump wasn’t working, so we removed it, took it apart, and filed corrosion off the points. Then we reassembled and bench tested it…viola… it worked! Hurray, we don’t have to spend $160 on a new fuel pump, just $22 for new points. And new flexible fuel lines, of course.
While crawling under the car, we inspected the floor pans and found a small hole in the floor on the driver’s side, right under the cross member. We may be able to repair it by welding in new metal from underneath. Otherwise, the floors look pretty solid.
 Next
we disassembled the passenger side front brake assembly and inspected the
caliper and rotor. Both may need replacing. There is a little side-to-side
wobble in the spindle – the king pin may need replacing, as well as the trunion
bushings. The sway bar bushings and sway bar ends need replacement, as
well as the tie rod ends.
Next
we disassembled the passenger side front brake assembly and inspected the
caliper and rotor. Both may need replacing. There is a little side-to-side
wobble in the spindle – the king pin may need replacing, as well as the trunion
bushings. The sway bar bushings and sway bar ends need replacement, as
well as the tie rod ends.

Then we took apart the hub and removed the inner and outer bearings. They look pretty good and only needed cleaning and repacking with grease.
We tested the lights and there are a few problems to sort out. The headlights are not working and the parking lights, sidelights, and directional lights on the passenger side are not working. It’s either a bad connector, or blown bulbs. We will clean all the electrical connectors and replace the bulbs. That may solve the problem.
Removed the spark plugs and squirted a little Marvel Mystery Oil in each cylinder.
Parts Search - Started a list of parts to purchase from Victoria British this month in order to take advantage of their winter sale.
 I
found a NOS Lockheed clutch slave cylinder
on ebay last week. A new one cost $125, but I got it
for $35! Also, I found a Brake Master Cylinder rebuild kit on ebay for $7
plus $2.35 shipping. Gotta love ebay.
I
found a NOS Lockheed clutch slave cylinder
on ebay last week. A new one cost $125, but I got it
for $35! Also, I found a Brake Master Cylinder rebuild kit on ebay for $7
plus $2.35 shipping. Gotta love ebay.


The radiator looked pretty beat up on the back side, with rusted fins just falling off, so we will get a new radiator from Victoria British. Fortunately it's on sale right now.

This is the lower radiator cross pipe. You can see where someone
unsuccessfully tried to weld it to the frame because both bolts that hold it
to the frame had broken off. We ground off the slag metal,
drilled out the holes in the cross pipe bracket, sanded and painted it with
black heat resistant paint. The result:

Then we drilled out the broken bolts in the frame rail and re-tapped the holes so we can properly bolt it back when we replace the radiator.
We also cleaned and lightly sanded all the electrical connections coming off the fuse box and then coated them with dielectric grease. The right side lights are still out.
Finally, spent 10 minutes cleaning all the crud off the fan blade! That's all for today.
 I think we may be fine here and will just clean everything up. The drums
look good and the emergency brake works.
I think we may be fine here and will just clean everything up. The drums
look good and the emergency brake works.Then we inspected the outer bearings and repacked them with grease.

Next we moved on to the clutch and removed the clutch slave cylinder. What a pain to get to! Here it is next to the new one we will install. Much better!
We will need a new pin.

Then we removed the clutch master cylinder. It's pretty rusty and our first thought was to just replace it, but first we decided to see if it would clean up.

It cleaned up pretty well using a wire brush on a drill, so we removed the parts in preparation for a rebuild. A rebuild kit for $4 beats a new clutch MC for $85 anyday!

Then we tackled removing the brake master cylinder. As you can see, the engine compartment looks really bad, so we decided to remove the whole pedal box. It would make removing the MC easier and we can start cleaning up the engine bay.

We managed to remove the rusty bolts without breaking any of them.
Now we have some work to do to clean all this up!
We decided to call it a day, feeling pretty good about the progress so far.
Then we worked on cleaning up the engine bay area under the pedal box.
 A wire brush on a drill took off a lot of the surface rust under the pedal
box and in the battery tray.
A wire brush on a drill took off a lot of the surface rust under the pedal
box and in the battery tray.
Still more to be done:

The master cylinder is in rough shape. Rich spent a couple of hours trying to get the plunger out without success. We deciding that it would be better to get a new one!